How to Install a Ceiling Fan Remote
After a long, hard day at work, your back and knees are aching, so you finally plop down in your favorite recliner in your living room to relax. But the room feels stuffy. The ceiling fan is off, so you groan at the thought of standing back up to pull the chain. A ceiling fan remote control would surely be handy right about now.
This simple upgrade could easily make life more convenient.
If you want to know how to install a remote control ceiling fan, you might be wondering if it's something you can do yourself. In many cases, you can. Once you see what happens above the fan canopy, the installation is often easier than you think.
Choose a Compatible Remote Control Kit
First things first. Make sure the ceiling fan remote control is compatible with your Hunter ceiling fan.
By installing a compatible receiver, your fan can respond to commands from a handheld remote, and you don't need to replace the fan.
New Hunter ceiling fans with remotes already include both the remote and receiver. When updating an existing fan or replacing a missing remote, confirm compatibility before opening the canopy.
Homeowners searching for how to install a ceiling fan with a remote often find that the project comes down to selecting a compatible control kit for their fan model. The easiest way to identify compatible controls is to look up your fan model on Parts & Manuals before you begin.
This quick check usually saves time compared to having to reopen the fan if the wrong control is installed.
How a Ceiling Fan Remote Works
Knowing how everything works before you get on the ladder makes the installation easier to understand.
When you press a button, it sends a wireless signal to a receiver above the fan. The receiver reads the command and tells the motor or light what to do.
This is why the wall control is still important. The wall control supplies power, while the remote is what you'll use daily. If the switch is off, the fan won't work because the receiver doesn't get power.
After installation, the receiver quietly does its job each time you use the remote.
Prepare Before You Open the Canopy
Getting ready ahead of time makes the rest of the project go more smoothly.
Turn off the power at the wall control, then turn off the breaker that supplies electricity to the fan. Always check that the power is off before touching any wires.
If your fan has pull chains, set the fan to High and the light to On before turning off the power. These settings let the remote control the fan and light after installation.
Gather the tools listed in your owner's manual before you get on the ladder. Having everything close by helps you stay focused once you lower the canopy.
Install the Receiver
If you're ready to install a ceiling fan remote, this is where the project really comes together.
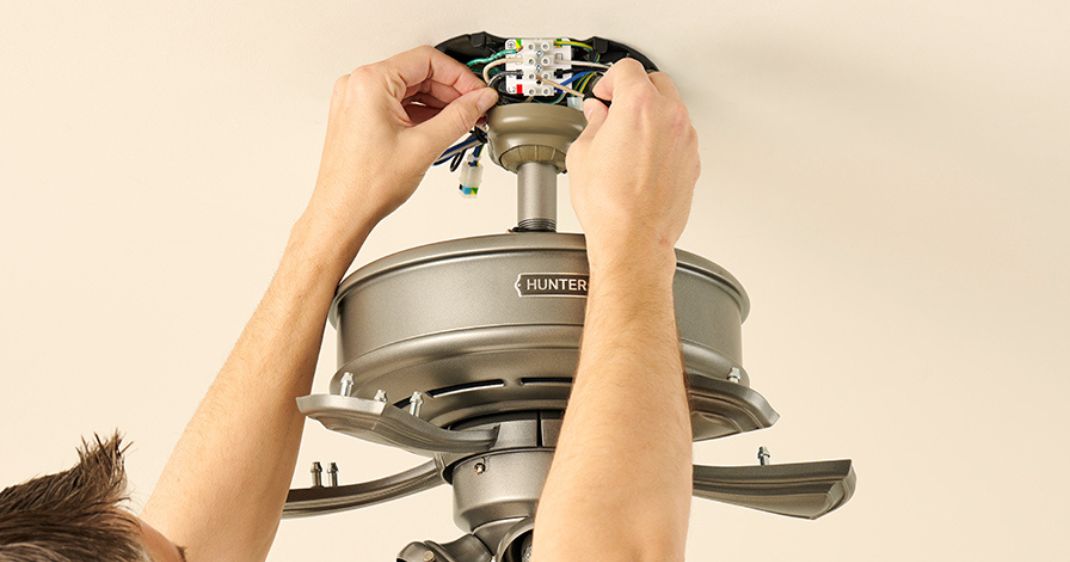
Lower the canopy to expose the mounting bracket and wiring above the fan.
The space above the fan often looks smaller than you might expect.
Instead of forcing all the wires to one side, let them rest naturally as you make each connection. This extra care makes it easier to put the canopy back on and helps prevent pinched wires.
The last few minutes of the installation are usually where small mistakes happen. As the receiver and wiring are tucked back into the mounting bracket, it's easy for a wire to move just enough to make reinstalling the canopy more difficult. Taking one last look while everything is still visible can save you from reopening the fan a few minutes later.
Each Hunter ceiling fan comes with model-specific installation instructions because wiring can vary. Follow the wiring diagram that comes with your fan or control to make sure everything is connected correctly before turning the power back on.
Once the canopy is back in place, you've finished the hardest part of installing a remote control ceiling fan.
How to Pair a Ceiling Fan Remote
Now that the canopy is back on, it's time to test everything.
Restore power at the breaker, then turn on the switch on the wall control.
If your Hunter ceiling fan came with a remote that's already paired, you're almost done. Test the light first, then cycle through each fan speed to make sure everything responds as expected.
If you need to pair your ceiling fan remote after installing a new receiver or remote, follow the pairing instructions included with your model. The steps can vary slightly between Hunter remotes, but the process usually only takes a few minutes.
People also search for how to sync ceiling fan remote controls. Hunter refers to this process as pairing the remote with the receiver.
Before you put the ladder away, test the fan the way you'll use it every day. Try each speed, turn the light on and off, and make sure every command responds correctly. It's much easier to fix a small issue now than to lower the canopy again later.
Give the Remote a Home
The installation is complete, but one small detail can make the upgrade even better.
Install the wall cradle that comes with your Hunter remote. Having one dedicated place for the remote makes it easier to find the next time you want to adjust the fan speed or turn on the light.
Mounting the cradle near the room entrance is often a practical choice. In a bedroom, placing it beside the bed may be even more convenient.
It doesn't take long, but it's one of those finishing touches you'll appreciate every time you use the fan.
Troubleshooting Common Ceiling Fan Remote Problems
Even after a successful installation, it's normal to have a question or two.
When the fan doesn't respond after restoring power, start by confirming the breaker and wall control are both on. For a replacement remote, repeat the pairing procedure using the instructions provided for your model.
When the light responds but the fan doesn't change speeds, check the pull chain. The fan should remain set to High so the remote can control each available speed.
A canopy that doesn't sit flush against the ceiling usually means the wiring needs a little more room to rest naturally. Lower the canopy, reposition the wiring, and try again before tightening the screws.
If you need a replacement remote or receiver, check out Hunter’s Ceiling Fan Controls for options.
Frequently Asked Questions
Can I install a ceiling fan remote without replacing the fan?
Yes. Installing a compatible receiver allows many existing Hunter ceiling fans to operate with a handheld remote while keeping the original fan in place.
How long does the installation usually take?
After reviewing the installation guide and confirming compatibility, many homeowners complete the project in about an hour.
Can I still use the wall control?
Yes. The switch on the wall control typically supplies power while the remote becomes the primary control during everyday use.
Will a remote work if my fan has two wall controls?
Many Hunter ceiling fans can still operate with a compatible remote. Check your owner's manual before beginning the installation.
Why won't the canopy close?
The wiring may simply need to be repositioned. Allowing it to rest naturally often provides the clearance needed to reinstall the canopy.
Do I need to remove the pull chains?
No. Leave the fan pull chain set to High and the light in the On position so the remote can manage both functions.
What happens if I lose my remote?
Hunter offers replacement remotes for many ceiling fan models. Confirm compatibility before ordering.
Where can I find installation instructions?
Visit Parts & Manuals to download model-specific manuals and installation guides.
Where can I learn more about installing Hunter ceiling fans?
The Hunter How To Hub includes additional installation videos, articles, and support resources.
Can I use a universal ceiling fan remote with a Hunter fan?
Hunter recommends using controls that are designed to work with your specific fan model. Checking compatibility before purchasing helps ensure proper operation.
Enjoy Your Newly Installed Remote
With the installation complete, you're ready to use your ceiling fan the way it was designed. A quick press of the remote lets you adjust the fan speed or light without leaving your seat.
Learning how to install a remote control ceiling fan is a project many homeowners can complete with the right control kit and model specific instructions. For compatible ceiling fan controls, replacement remotes, and helpful installation resources, look to Hunter Fan to help you complete your project with confidence.